TL;DR
Moving your rig into a closet can drastically reduce noise at the source. Proper placement and layered treatment—covering walls, door, and corners—turns a small space into a quiet, effective vocal booth. Seal gaps, add absorption, and ventilate for best results.
Ever feel like your gear is a roaring beast, but your voice sounds pristine? The secret isn’t just in fancy foam or expensive microphones. It’s about where you put everything and how you treat the space around it.
Many creators are turning their closets into stealthy vocal booths, hiding noisy rigs behind blankets, panels, and strategic placement. This guide reveals how to tame that noise, optimize your setup, and get studio-quality sound in the smallest of spaces—without breaking the bank or building a soundproof bunker.
Acoustic dampening
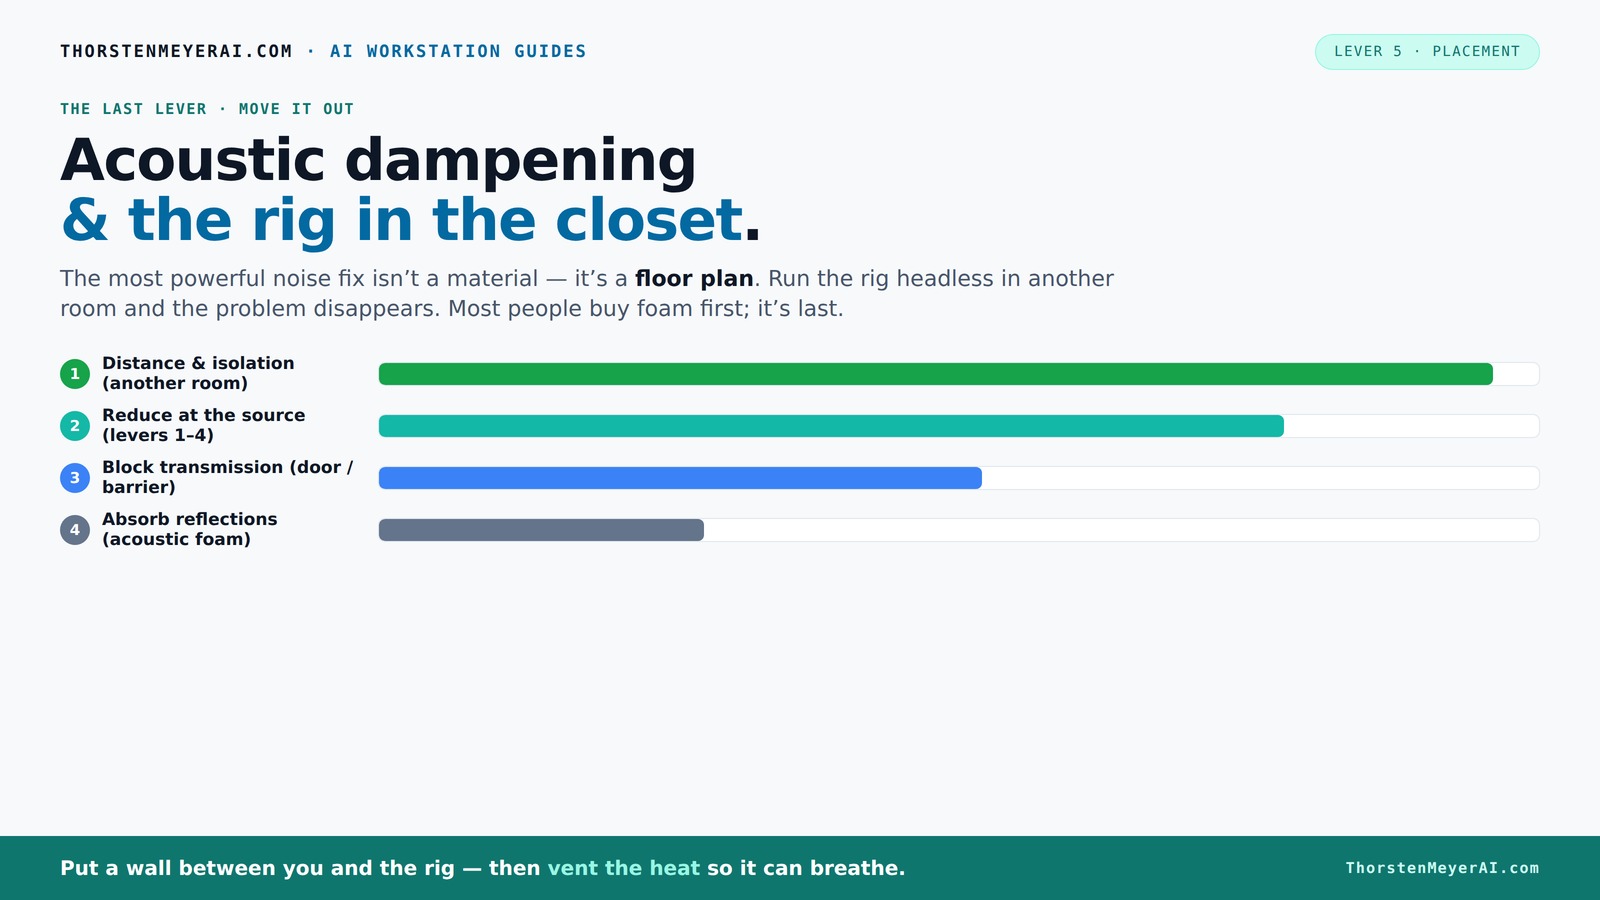
& the rig in the closet.
The most powerful noise fix isn’t a material — it’s a floor plan. A rig you can’t hear because it’s in another room beats any amount of foam. Tap the approaches in Part 1 to see what actually works.
(another room)
(levers 1–4)
(door / barrier)
(acoustic foam)
Contain the noise, not the heat
Key Takeaways
- Distance your rig from your workspace whenever possible — it's the most effective noise fix.
- Ventilate properly if placing your machine in a closet or sealed space; heat buildup kills quietness.
- Layer soft materials to cover walls, ceiling, and door—more coverage equals better sound control.
- Seal gaps around doors and cracks to prevent sound leaks, especially in small closets.
- Treat low frequencies with bass traps in corners to avoid boomy, muddled sound.

Focusound 52 Pack Acoustic Foam Panels 1" x 12" x 12" Sound Proof Foam Panles Soundproofing Noise Cancelling Wedge Panels for Home Office Recoding Studio with 300PCS Double-Side Adhesive
Soundproofing - Acoustic foam panels triangular grooves structure for better noise absorption, helps to reduce and absorb unwanted...
As an affiliate, we earn on qualifying purchases.
As an affiliate, we earn on qualifying purchases.
How Moving Your Rig Can Make All the Difference
The biggest leap in noise reduction is simply moving your computer or GPU rig out of your workspace. Think of it like putting a loud, rumbling engine in another room—suddenly, your quiet office is just that: quiet.
For most AI workstations, you don’t need to sit next to the machine. You can SSH in, or connect over a fast network, and keep the noise far away. The sound of a 600W GPU rig in a closet is hardly noticeable from your desk, especially if you have a wired connection and decent ventilation.
This approach is the top-tier fix—distance and isolation are unmatched for reducing noise and heat. Plus, it frees you from the endless struggle to dampen sound with foam alone.

VEVOR Portable Vocal Booth, 6.56 ft Height, Portable Recording Studio with Travel Bag, Mobile Tablet Stand, Thickened Soundproofing, Sound Isolation Booth for Echo-Free Vocals, Podcasts, Voiceovers
Say Goodbye to Echoes: Built with durable Oxford cloth and acoustic padding, this recording booth for the home...
As an affiliate, we earn on qualifying purchases.
As an affiliate, we earn on qualifying purchases.
The 'Rig in the Closet' Setup — How to Keep It Cool While Quieter
Placing a powerful, heat-generating machine inside a closet sounds simple, but heat is the enemy. Trapped heat cooks your components, causes throttling, and turns your quiet plan into a noisy, overheating mess.
To keep your setup cool, you need ventilation. Passive vents with a small, quiet exhaust fan work wonders, especially if paired with ducting that directs hot air outside. Consider a purpose-built soundproof cabinet that combines absorption and airflow management for a sleek, quiet, and cool solution.
Don’t fully seal the closet unless you have a thermostat-controlled exhaust. Otherwise, temperatures can soar, throttling your GPU and making fans scream. Check out this guide for detailed cooling strategies.

Weather Stripping Door Seal Strip - Soundproof Q-Shaped Foam for Exterior Door Frame, Large Gap Seal, Noise Cancelling, Easy to Install (Black, 26FT)
No light penetration: Our door seals are made of high-density foam core material, which effectively blocks light from...
As an affiliate, we earn on qualifying purchases.
As an affiliate, we earn on qualifying purchases.
Acoustic Dampening vs. Soundproofing: What You Really Need in a Closet
Acoustic dampening and soundproofing are often confused but serve different purposes. Dampening reduces echo and reflections inside the space—think of it as softening the room’s reverberations. Soundproofing stops sound from leaking out or coming in.
In a closet, your goal is mainly to control reflections and reduce noise transmission. Foam panels and blankets help soften echoes, but won’t block sound if the door or gaps aren’t sealed. To truly soundproof, you need mass, sealing, and vibration isolation—more complicated and costly.
Understanding these differences matters because choosing the right approach depends on your goal. If your priority is quiet recording with minimal noise escape, focus on layering soft materials and sealing gaps. If you need to prevent sound from disturbing others or being disturbed, invest in mass and structural modifications. For a small closet, effective sealing and absorption are usually enough to significantly improve sound quality without the complexity and expense of full soundproofing.

24 Pack Black 12 x 12 x 2 Inches Pyramid Designed Acoustic Foam Panels, Sound Proof Foam Panels for Walls, High Density and Flame-Retardant Acoustic Panels, Sound Panels for Recording and Home Studio
Exceptional Sound Absorption:These pyramid acoustic panels are engineered to effectively absorb sound waves, reducing echo and reverberation. With...
As an affiliate, we earn on qualifying purchases.
As an affiliate, we earn on qualifying purchases.
Placement Strategies: Where to Position Your Microphone and Gear
Placement is king when it comes to capturing clear sound in a small space. Start with the microphone: position it away from reflective surfaces, ideally at the 'first reflection point,' which is roughly where the sound from your mouth hits the wall and bounces back.
If your closet is tiny, add absorption on the desk or nearby surfaces—materials like foam, moving blankets, or even thick towels work well. Experiment with mic height and angle to minimize unwanted reflections and room noise.
For example, placing your mic slightly above or below your mouth and aiming it toward a treated wall can cut down on room echo. Remember, treating the reflection points makes the biggest difference.
Materials That Turn a Closet Into a Sound Sanctuary
Choosing the right materials is essential. Thick acoustic panels and bass traps are best for controlling low frequencies in tiny booths, while foam or moving blankets work well for high-frequency absorption. Materials that turn a closet into a sound sanctuary include these options.
Think of it like layering: heavier, denser materials soak up the boomy lows, while lighter fabrics soften the highs. For a closet, covering the walls, ceiling, and door with blankets, panels, or foam creates a cocoon of softness that minimizes echo and sound leakage.
Layering multiple types of materials enhances overall absorption. For example, placing foam panels on the walls and a thick blanket over the door creates a multi-layered barrier that reduces both reflections and sound escape. This layered approach is more effective than relying on a single material, as it targets different frequencies and sound paths, resulting in a more balanced and controlled sound environment. Materials that turn a closet into a sound sanctuary include these options.
How to Seal Your Closet Door and Gaps for Better Sound Containment
Doors and gaps are the weak spots in any closet setup. Air leaks let sound escape and reflections bounce around. Sealing these gaps is simple but effective.
Use weatherstripping around the door frame, add a heavy blanket or panel over the door, and seal cracks with acoustic sealant. For a quick fix, layered blankets or removable panels work well, especially if you want flexibility. How to seal your closet door and gaps for better sound containment.
Sealing gaps is crucial because even small openings can significantly reduce the containment of sound. Air leaks not only allow noise to escape but also let external sound enter, undermining your effort to create a quiet environment. Proper sealing ensures that your layered treatments are more effective, as sound is less likely to find escape routes. This combined approach—sealing plus absorption—maximizes your soundproofing potential without extensive construction.
Dealing with Corners and Low Frequencies in Small Spaces
Corners are the bass trap's best friends—and your closet’s worst enemies. Low frequencies tend to build up in corners, creating boomy, muddled sound. Dealing with corners and low frequencies in small spaces.
Adding bass traps or heavy absorption panels in the corners helps flatten out these low-end issues. For small booths, a simple foam bass trap or thick blanket stuffed into the corner can make a huge difference.
Placing bass traps in corners prevents low frequencies from bouncing and accumulating, which otherwise results in a boomy, muddy sound that obscures clarity. Proper treatment of these buildup areas ensures your vocal recordings sound natural and balanced. In small closets, even inexpensive DIY solutions like thick blankets or foam in the corners can dramatically improve clarity by reducing low-frequency resonance and muddiness.
Coverage Is Key: Cover More Wall and Ceiling Space for Better Results
The more surface area you cover with absorption, the better your room will sound. Small closets benefit from extensive coverage—think blankets, panels, and foam on walls, ceiling, and even the door.
Instead of a few isolated panels, aim for as much coverage as your budget and space allow. This reduces echo, improves clarity, and keeps sound contained.
Maximizing coverage ensures that reflections are minimized from all directions, creating a balanced, natural sound environment. Covering at least 70-80% of the available surfaces allows the space to become a controlled acoustic environment, preventing echoes and standing waves that can distort recordings. This comprehensive approach is especially important in small, reflective spaces where every surface contributes to the overall sound quality.
When Is True Soundproofing Realistic in a Closet?
Soundproofing a closet is possible but requires more than just absorption. It involves sealing gaps, adding mass, and isolating vibrations. Without these, sound can still escape.
For example, to truly soundproof a closet, you’d need to install a sealed door with acoustic seals, add mass-loaded vinyl or drywall, and isolate the rig from the structure. DIY solutions with blankets and foam are good for reflection control but don’t fully block sound.
Realistic soundproofing involves significant modifications and investments. It’s about creating a barrier that sound cannot easily pass through, which often means adding mass and damping vibrations rather than just absorbing sound. While complete soundproofing in a closet can be complex and costly, even modest improvements—like sealing gaps and adding mass—can greatly reduce noise leakage, making your setup much quieter for both recording and neighborly peace of mind.
Frequently Asked Questions
Is acoustic foam enough for a closet studio?
Not quite. Foam helps reduce high-frequency reflections but won’t control low-end build-up or block sound from escaping. Layering foam with heavier materials and sealing gaps makes a bigger difference.
Where should I place acoustic treatment first?
Start with your mic placement—aim for the first reflection point—and treat nearby surfaces. Cover the door and corners with bass traps or blankets for best results.
Do I need bass traps in a closet?
Yes, especially in small, enclosed spaces. Bass traps help tame low-frequency buildup that causes boominess and muddiness in your recordings.
Should I put blankets on the walls or ceiling?
Absolutely. Covering walls and ceiling with blankets or panels significantly reduces reflections and echoes, making your space sound much better.
How can I stop sound from leaking out?
Seal gaps with weatherstripping, use heavy blankets over gaps and doors, and add mass where possible. Absorption alone isn’t enough for full soundproofing.
Conclusion
Turning a closet into a quiet, functional studio isn’t magic—it’s smart placement, layered treatment, and good ventilation. Think of it like wrapping your rig in a soft, sound-absorbing cocoon that keeps noise in check while staying cool.
Remember, the real power lies in what you don’t see—distance, sealing gaps, and covering surfaces. Use these tricks, and you'll never have to suffer through noisy gear again. Your workspace will be peaceful, your voice clearer, and your setup more flexible.